CS korin etupuskurin irroitus
CS korin etupuskurin irroitus
Hei, löytyisikö keltään ohjeita miten CS (ei aero) korin etupuskurin saisi irti maalausta varten ?
Saab 9000 CS 2.0t A -98
Saab 9-5 Aero Man. -04
Saab 9-5 Aero Man. -04
-
P.Y-J. Kannisto
- "Hirsch"
- Viestit: 901
- Liittynyt: Ti Helmi 09, 2010 08:04
- Paikkakunta: Huittinen / Ypäjä
Re: CS korin etupuskurin irroitus
Jos nyt hieman yritän muistella, kun kukaan muukaan ei mitään muista. Kulmista haitarikumi vääntämällä pois ja siellä tais olla jotkut ruuvit.
Löytyiköhän ajovalojen alta pystyssä olevat noin 10mm pultit ne veks. Tietysti alalippa on jokusilla ruuveilla kiinni. Muutama tunti sitten olisin vielä voinut tarkastaa asian ko. autosta.
Löytyiköhän ajovalojen alta pystyssä olevat noin 10mm pultit ne veks. Tietysti alalippa on jokusilla ruuveilla kiinni. Muutama tunti sitten olisin vielä voinut tarkastaa asian ko. autosta.
Saab 9-5 Vector -03 450 tkm
Numerossa 040 538 0231 autetaan kohtalontovereita, on tekkii ja miggii
Numerossa 040 538 0231 autetaan kohtalontovereita, on tekkii ja miggii
-
tosiynnäri
- "Turbo"
- Viestit: 227
- Liittynyt: La Loka 16, 2010 23:25
Re: CS korin etupuskurin irroitus
Tästä voisi olla jotain apua:
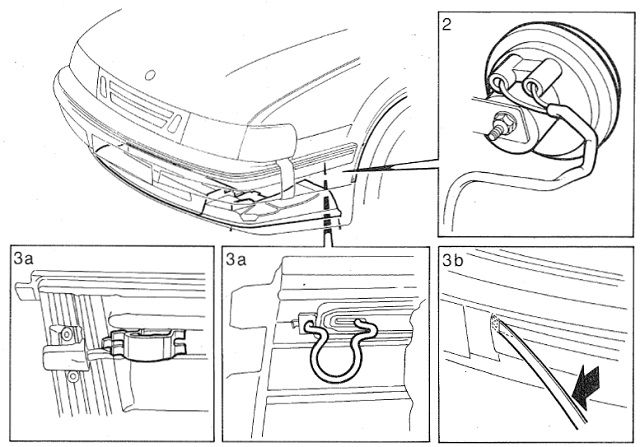
Bumpers,front removal and installation
1 Remove the outer shield and the central shield under the car.
2 Unscrew the temperature sensor and insert through the orifice spoiler. Then remove the screws that hold the spoiler.
3 Remove the two screws holding it and lift the bumper.
When mounting the bumper, the grooves of the outer casing must adapt to the wings tongues before. First of all mount the outside shield, insert the bottom tab on the front edge of the inner wing. Install screws loosely. Insert the clip of the central shield on the support frame. Install screws loosely. Adjust shields and tighten all screws.
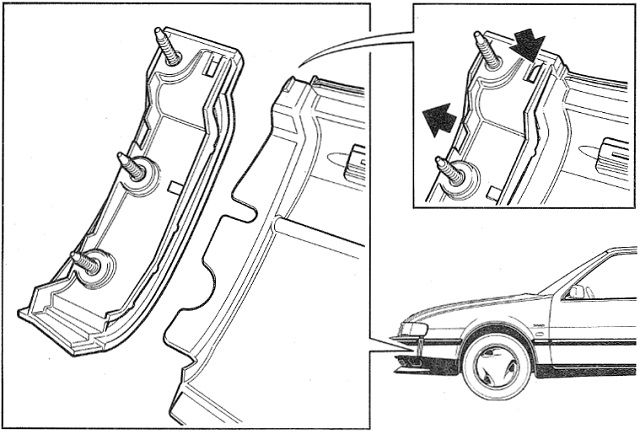
Disassembly and assembly
Unscrew the metal bar, remove the outer housing by turning and remove the mass of the bumper. Assembly is done in reverse order.
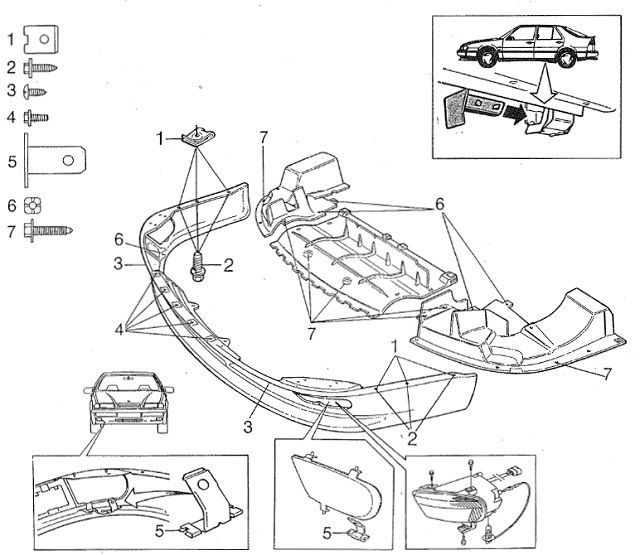
Trim strip, front bumper
Disassembly and assembly
1 Remove outer shield left or right in order to make accessible the tension spring of the trim strip. 2 Relates to the left: Remove the horn of the mounting bracket.
3 Remove the trim strip as follows:
a. Release the tension spring of the trim strip.
b. Insert a screwdriver and unhook the claw that holds the tape trim to the bumper.
Assembly is done in reverse order.
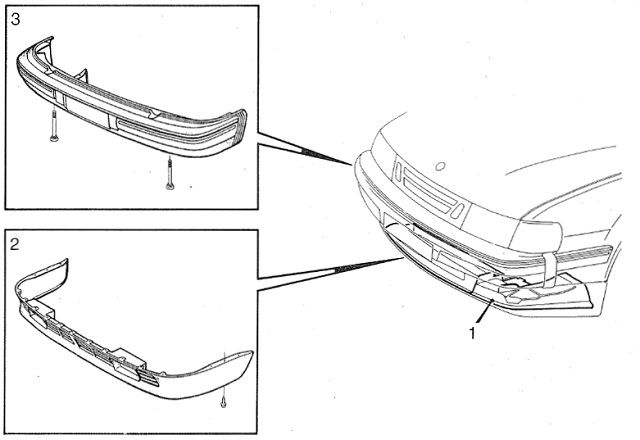
bumper housing SAAB 9000 CS
To ensure the adjustment of the bumper of the front housing with respect to the bodywork, there is a locking lug (1) on the ends of the housing. These locking heel lock on the housing side spoilers. When the bumper housing must be reassembled, the locking heels must be unlocked side spoilers with a screwdriver or similar.
Front spoiler and air shields, Saab 9000 CS
1 Clips (6)
2 screws (6)
3 screws (2)
4 M4 screws (5)
5 Clips (2)
6 Clips (4)
7 M6 screws (14)
The front spoiler and air shields are mounted as shown in the figure.
Bumpers,front removal and installation
1 Remove the outer shield and the central shield under the car.
2 Unscrew the temperature sensor and insert through the orifice spoiler. Then remove the screws that hold the spoiler.
3 Remove the two screws holding it and lift the bumper.
When mounting the bumper, the grooves of the outer casing must adapt to the wings tongues before. First of all mount the outside shield, insert the bottom tab on the front edge of the inner wing. Install screws loosely. Insert the clip of the central shield on the support frame. Install screws loosely. Adjust shields and tighten all screws.
Disassembly and assembly
Unscrew the metal bar, remove the outer housing by turning and remove the mass of the bumper. Assembly is done in reverse order.
Trim strip, front bumper
Disassembly and assembly
1 Remove outer shield left or right in order to make accessible the tension spring of the trim strip. 2 Relates to the left: Remove the horn of the mounting bracket.
3 Remove the trim strip as follows:
a. Release the tension spring of the trim strip.
b. Insert a screwdriver and unhook the claw that holds the tape trim to the bumper.
Assembly is done in reverse order.
bumper housing SAAB 9000 CS
To ensure the adjustment of the bumper of the front housing with respect to the bodywork, there is a locking lug (1) on the ends of the housing. These locking heel lock on the housing side spoilers. When the bumper housing must be reassembled, the locking heels must be unlocked side spoilers with a screwdriver or similar.
Front spoiler and air shields, Saab 9000 CS
1 Clips (6)
2 screws (6)
3 screws (2)
4 M4 screws (5)
5 Clips (2)
6 Clips (4)
7 M6 screws (14)
The front spoiler and air shields are mounted as shown in the figure.
Re: CS korin etupuskurin irroitus
Kiitos, unohtui tarkentaa siis ettei palkkia tarvitse itsellä irroittaa vaan pelkkä muovipuskuri maalausta varten, mutta eiköhän noiden perusteella suuntaa-antavasti irtoa. 
Saab 9000 CS 2.0t A -98
Saab 9-5 Aero Man. -04
Saab 9-5 Aero Man. -04

Re: CS korin etupuskurin irroitus
Kuori ei irtoa ilman palkkia.
Re: CS korin etupuskurin irroitus
Joo, siis palkki irti, äläkä edes yritä irroittaa kuorta palkista, ellei ole jostain kumman syytä ihan pakko ei varmasti irtoa ihan helpolla enää.
Turkka Kivelä #(ei voi muistaa ulkoa)
9-5 2.3 AERO -08, käyttis
9000 2.3 CDTA griffin -97, 96 -77, harrastuksia pitää olla.
9-5 2.3 AERO -08, käyttis
9000 2.3 CDTA griffin -97, 96 -77, harrastuksia pitää olla.
Re: CS korin etupuskurin irroitus
Jahas, no irroitetaan palkin kera sitten maalaamoa varten Saas nähdä miten hankalaksi/vaikeaksi menee, mutta pakko tehdä itse, koska maalaamo oli ottamassa n.400e irroituksesta ja asennuksesta.
Saab 9000 CS 2.0t A -98
Saab 9-5 Aero Man. -04
Saab 9-5 Aero Man. -04
Re: CS korin etupuskurin irroitus
Palkin kanssa se on ihan helppo ottaa irti, kuorta irrotettaessa menee paljon kauemmin sen jälkeen, kun itse puskuri on jo irti. Ja malari saa sen puskurin nätisti telineeseen sen palkin kanssa.
Matti
Matti
Keski-Pohjanmaan Kamariorkesteri
# 1988 = Matti Vanhamäki
# 1988 = Matti Vanhamäki
Re: CS korin etupuskurin irroitus
Puskuri irtosi nätisti kuten myös spoilerikin, ainoastaan pitkät isot pultit oli vähän työläät saada auki jotka pitää puskuria paikallaan mutta nekin lopuksi otti ja irtosi.
Nyt vain saa jännätä että kuinka maalari "paskoo" koko keulan maalauksen
ps. pitää käydä etsiin rosterisia ruuveja/pultteja kun kasaa keulan takaisin.
Nyt vain saa jännätä että kuinka maalari "paskoo" koko keulan maalauksen
ps. pitää käydä etsiin rosterisia ruuveja/pultteja kun kasaa keulan takaisin.
Saab 9000 CS 2.0t A -98
Saab 9-5 Aero Man. -04
Saab 9-5 Aero Man. -04
Re: CS korin etupuskurin irroitus
Kannattaa käyttää taktista harkintaa rosteriosien kanssa, siitä meinaan uhrautuu helposti viereinen palikka ensin. Todennäköisesti vaihdat jatkossakin huomattavasti mieluummin sen pultin kuin palan sitä puskurin takana olevaa palkkia, johon se pultti kiinnittyy.
Salaisen agentin työ on vaivalloisempaa kuin trigonometristen yhtälöiden soveltaminen käytännön höpsismiin.
-Agentti Tuplanolla
-Agentti Tuplanolla